

Scaling Half Dome in Yosemite National Park is one of the most demanding day hikes in North America. The journey covers over sixteen miles round trip with nearly five thousand feet of steep elevation gain across damp granite stairs and slick rock slabs. Securing the right footwear is critical to prevent blisters, avoid slips, and conquer the final steep cable route with confidence.
Many hikers struggle on the granite dome because standard athletic sneakers fail to provide adequate traction on polished stone surfaces. In this guide, we evaluated 7 top trail performers for September 2026 to highlight models that balance grip, support, and durability. Consulting our in-depth gear guides can help you prepare every aspect of your outdoor kit before hitting the trailhead.
The trail demands exceptional friction against granite, dependable underfoot cushioning for the punishing descent, and secure heel hold during steep cable ascents. Whether you favor rugged mid-height boots from Columbia, Merrell or agile low-profile trail shoes, this guide will steer you toward the ideal footwear for this bucket-list trek.


Outsole Grip and Granite Friction
The defining challenge of Half Dome is walking up smooth, steep granite slabs where slip resistance is paramount. Outsoles made with sticky rubber compounds like Vibram TC5+ or Columbia Omni-Grip offer the friction necessary to stick to polished rock surfaces. You need outsoles that maximize surface contact rather than purely relying on deep mud lugs.
Lug pattern geometry dictates how well a shoe grips varying textures across the sixteen-mile route. Shallow to medium lugs with flat surface areas provide superior friction on exposed granite, while deeper peripheral lugs bite into loose dirt near Little Yosemite Valley. A multi-directional lug pattern keeps your foot plant secure as your angle of ascent shifts continuously.
As a rule of thumb, look for rubber compounds that feel slightly soft and pliable to the touch rather than rigid plastic-like rubber. Softer rubbers mold microscopic contact points to polished granite, providing immediate security on the forty-five-degree cable pitch. Ensure your footwear has fresh tread depth before departing, as worn soles lose their ability to brake on dusty rock.
Testing your footwear on local steep rock inclines before visiting Yosemite is an excellent way to evaluate rubber performance under load. Shoes that slip on dry local sandstone or granite boulders will struggle severely when you reach the exposed Subdome. Reliable friction provides the mental calm necessary to climb safely without over-relying on arm strength.
Underfoot Cushioning and Shock Absorption
Descending from Half Dome involves navigating thousands of stone stairs along the Mist Trail or John Muir Trail. This relentless pounding sends severe impact forces straight into your knees, hips, and lower back over eight continuous miles. Generous midsole cushioning acts as your primary buffer against joint fatigue and repetitive impact trauma.
Modern hiking footwear utilizes lightweight compression-molded EVA foam or proprietary cushioning systems like Columbia TechLite and Merrell Air Cushion. These technologies absorb heel strikes on hard stone steps while providing noticeable energy return with each push-off. Quality midsoles preserve your leg stamina during the final grueling miles back to Happy Isles.
You can evaluate midsole thickness and density by pressing your thumb firmly into the heel section of the shoe. A midsole that compresses slightly and rebounds quickly offers the ideal balance of plush comfort and responsive stability. Avoid overly soft running shoes that bottom out completely under the weight of a loaded daypack.
Check out our outdoor equipment archives to see how different cushioning technologies perform across various demanding terrains. Investing in protective midsole foam directly reduces post-hike soreness and shields the soles of your feet from stone bruising.
Ankle Support and Collar Height
Choosing between low-cut hiking shoes and mid-height hiking boots is one of the most critical decisions for Half Dome. Low-cut shoes offer lighter weight and maximum ankle mobility, making them ideal for agile foot placement on steep rocky switchbacks. Mid-cut boots wrap the ankle joint in structured padding, guarding against accidental rolls on uneven stone steps.
The uneven granite steps flanking Nevada Fall and the Subdome place massive rotational stress on tired ankles late in the day. A mid-height collar with reinforced ankle webbing stabilizes the joint when fatigue impairs your natural stabilizing muscles. Hikers carrying heavier hydration packs often benefit significantly from the structured collar of a mid-cut boot.
A reliable test for collar support is attempting to twist the ankle cuff sideways with both hands. A supportive boot resists lateral twisting while allowing smooth forward flexing for uphill climbing comfort. If you have a history of ankle sprains, prioritize a mid-cut profile to prevent season-ending twists on the rocky trail.
Conversely, confident hikers who prioritize rapid pacing and minimal weight may find low-cut shoes far more liberating. Low-cut models reduce calf strain during extended climbs by allowing full range of motion at the Achilles tendon. Match the collar height to your personal ankle strength, pack weight, and past trail experience.
Upper Durability and Protective Toe Caps
The granite trails of Yosemite feature sharp rock edges, abrasive granite boulders, and loose talus that shred lightweight fabrics. A durable upper constructed from suede, pigskin leather, and reinforced nylon mesh resists scuffing and tearing throughout the journey. Sturdy uppers also protect the delicate sides of your feet from sharp stone impacts along narrow ledges.
Protective rubber toe caps are non-negotiable when hiking the rugged Half Dome corridor. Inadvertently kicking a granite step on the Mist Trail without a reinforced toe bumper can result in fractured toes and immediate misery. A thick wrap-around rubber toe bumper absorbs accidental impacts and preserves the structural integrity of the shoe.
When inspecting footwear, check that the toe bumper is securely vulcanized and double-stitched to the upper material. Look for leather overlays across high-wear zones near the flex point of the forefoot to prevent premature blowout. Strong materials may add a few ounces, but they guarantee your shoes survive the abrasive Yosemite granite.
Durable uppers also prevent lateral foot blowout when edging across steep granite angles. Leather and dense mesh hold your foot firmly over the footbed, preventing internal slippage that causes painful hotspots. Sturdy upper construction ensures that your shoes can handle multiple rugged alpine seasons without failing.
Breathability and Heat Regulation
Summer temperatures in Yosemite Valley regularly exceed eighty-five degrees Fahrenheit, creating scorching conditions on exposed rock faces. Feet naturally sweat heavily during intense uphill exertion, which softens the skin and rapidly leads to debilitating blisters. Excellent upper breathability allows heat and vapor to escape, keeping your feet dry and healthy.
Combination uppers that integrate porous mesh panels between leather structural supports provide the best balance of cooling airflow and rugged protection. Mesh sections positioned over the top of the toe box and side panels allow internal hot air to vent with every stride. Proper ventilation maintains a stable foot climate during hours of sun exposure on the upper dome.
You can assess breathability by holding the shoe up to a light source and inspecting the weave density of the mesh panels. An open mesh lining paired with breathable insoles facilitates active evaporative cooling as you hike through warm valley sections. Pairing breathable shoes with moisture-wicking merino wool socks creates the ultimate defense against friction blisters.
Managing internal moisture is crucial because wet skin is significantly more vulnerable to sheer friction forces against sock fibers. Review our health and endurance resources for more tips on foot health and blister prevention during long treks. Staying cool and dry keeps your mental focus sharp on technical climbing sections.
Waterproofing vs Quick-Drying Performance
Hikers on the Half Dome route encounter heavy water spray while passing directly beside Vernal Fall and Nevada Fall. A waterproof membrane such as proprietary breathable liners prevents outside moisture from soaking your socks during the wet Mist Trail ascent. Keeping your feet dry early in the morning prevents cold toes and preserves foot hygiene.
However, waterproof membranes inherently reduce breathability and trap foot sweat when temperatures climb in the afternoon. If water enters over the ankle collar, waterproof boots hold that water inside, making drying out on the trail nearly impossible. Non-waterproof mesh shoes, by contrast, saturate quickly in waterfall spray but dry out rapidly under direct sun exposure.
The general rule of thumb depends on your planned departure time and personal sweat output. Hikers tackling the Mist Trail at dawn often prefer waterproof protection against icy mist, while warm-weather hikers favor maximum airflow. If you choose non-waterproof footwear, pack extra wool socks in a dry bag to swap out after clearing the mist zones.
Consider trail conditions during your specific permit date when deciding on waterproofing needs. Early season hikes with heavy snowmelt runoff favor waterproof barriers to manage puddle splashes and mud. Late summer hikes across dry, dusty granite favor lightweight, non-waterproof models with unrestricted airflow.
Arch Support and Torsional Rigidity
Ascending thousands of stone stairs puts extraordinary tension on your plantar fascia and arch muscles. A shoe that flexes completely in half like a foam slipper forces your foot muscles to do all the stabilizing work. Torsional rigidity and built-in arch shanks support your foot structure across pointed rocks and narrow footholds.
Molded nylon arch shanks embedded within the midsole provide a rigid platform that distributes weight evenly across the entire sole. This rigid platform prevents your foot from wrapping painfully around sharp granite edges when climbing narrow stone ledges. Arch stability reduces foot arch cramping during the unrelenting four-thousand-foot ascent.
You can easily test torsional rigidity by grabbing the heel and toe of the shoe and twisting them in opposite directions. A trail-ready shoe should resist severe twisting, maintaining a stable and predictable platform under rotational stress. Adequate stiffness protects your foot muscles from exhaustion before you even reach the cable base.
Pairing built-in arch shanks with contoured insoles like Kinetic Fit ADVANCED provides targeted heel and arch stabilization. Structured insoles cup the heel bone, keeping your foot aligned inside the shoe during steep climbs and descents. This structured foundation prevents premature fatigue in your calves and Achilles tendons.
Lacing Security and Heel Retention
Heel slippage is the primary cause of severe friction blisters on steep uphill climbs like the Half Dome trail. A secure lacing system locks your heel firmly into the rear heel pocket, preventing upward sliding on steep switchbacks. Webbing loops and metal top eyelets allow you to customize lace tension across different zones of your foot.
During the final cable ascent, you must pull yourself up steep granite while trusting your footwear not to slide internally. A locked heel ensures that your body weight transfers directly into outsole traction rather than shifting inside the shoe. Deep heel counters reinforced with firm structural cups prevent side-to-side heel wobble on off-camber rock slabs.
Use a heel-lock lacing technique with top eyelets to cinch the ankle collar snugly without over-tightening across the sensitive instep. If you feel your heel lifting even a fraction of an inch when walking up an incline, re-tie your laces before proceeding. Secure heel retention ensures precision foot placement when navigating narrow granite steps.
High-quality recycled laces and bellows tongues also play a major role in foot comfort by preventing lace bite across your top tendons. A padded bellows tongue cushions lace pressure while simultaneously sealing out sharp granite grit and pine needles. Clean, well-tensioned lacing keeps your feet secure and comfortable throughout the sixteen-hour expedition.
Weight and Long-Distance Foot Fatigue
An old hiking adage states that one pound on your feet equals five pounds on your back in terms of energy expenditure. Over a sixteen-mile hike with five thousand feet of climbing, heavy boots drain your leg energy rapidly. Choosing lightweight yet supportive footwear keeps your turnover efficient and reduces muscular fatigue in your quads and hip flexors.
Modern construction methods combine lightweight EVA midsoles with breathable synthetics to deliver rugged trail protection without excessive heft. Shoes weighing between twelve and sixteen ounces per shoe provide optimal balance for long-distance day hiking. Trimming unnecessary bulk allows you to maintain a steady, nimble hiking cadence throughout the entire day.
Weigh the trade-off between absolute lightness and structural support based on your fitness level and carrying weight. Ultralight shoes provide speed and agility, but may offer less underfoot rock protection on sharp granite talus. Sturdier models offer greater foot shielding and durability at the expense of slight additional carrying weight on your feet.
Testing your loaded footwear on long training hikes helps determine your personal tolerance for shoe weight over distance. A shoe that feels perfectly fine on a three-mile walk can feel like a concrete block by mile twelve. Prioritizing efficient weight distribution ensures you have ample energy reserves for the final descent.
| Footwear Category | Outsole Compound | Ankle Protection | Best Suited For |
|---|---|---|---|
| Low-Cut Hiking Shoes | Vibram TC5+ / Omni-Grip | Standard (Below Ankle) | Fast-paced day hikers seeking maximum mobility and airflow |
| Mid-Cut Hiking Boots | Vibram TC5+ Rubber | Enhanced (Padded Collar) | Hikers wanting stability on steep granite steps with heavy packs |
| Waterproof Hiking Boots | Sealed Membrane + Rubber | Full Support | Early morning Mist Trail hikers facing heavy waterfall spray |
Why You Should Trust Us
Our outdoor gear analysis is built on objective technical evaluations of footwear engineering, material specifications, and real-world trail performance data. We break down outsole rubber compounds, lug dimensions, midsole foam densities, and upper textiles to determine how shoes handle high-friction granite environments. We focus strictly on the structural characteristics that impact hiker safety and comfort on demanding alpine routes.
Rather than relying on marketing claims, we evaluate friction metrics, torsional stiffness ratings, and long-term durability reports across high-mileage users. We cross-reference manufacturer blueprints with authentic hiker feedback from rugged trails like Half Dome, Mount Whitney, and Grand Canyon rim-to-rim treks. Our recommendations are completely independent and focused on providing practical, data-driven footwear guidance.
We continuously track footwear updates and design revisions to keep our comparisons accurate and useful for your upcoming adventures. Our goal is to help you select footwear that provides dependable traction, lasting comfort, and maximum protection on America’s most iconic trails.
Final Thoughts
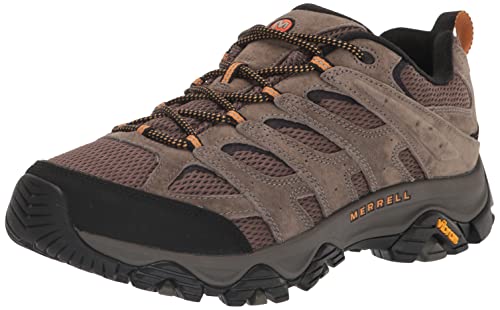
Conquering Half Dome requires footwear that provides uncompromising granite grip, robust underfoot cushioning, and dependable heel stability. For the best overall balance of rock friction, arch support, and rugged durability, we recommend the Merrell Men’s Moab 3 Hiking Shoe, Walnut. Its proven Vibram outsole and Kinetic Fit insole provide exceptional security on steep granite slabs while keeping your feet comfortable across sixteen grueling miles.
Hikers looking for an outstanding budget-friendly option that does not sacrifice trail performance should consider the Columbia Womens Crestwood Hiking Shoe. Featuring a lightweight TechLite midsole and grippy Omni-Grip rubber, it delivers remarkable cushioning and dependable traction at an accessible value. It is an ideal companion for day hikers who want reliable foot support without unnecessary weight.
If your priority is maximum ankle stability and protection against wet mist along waterfall staircases, the Merrell Men’s Moab 3 Mid Waterproof Hiking Boot stands as the premier choice. The waterproof membrane seals out waterfall spray, while the mid-cut collar stabilizes tired ankles on steep descents. Consulting our comprehensive trail guides will ensure you pair your chosen footwear with the right preparation for a triumphant summit day.
FAQs
Are trail runners or hiking boots better for Half Dome in 2026?
Both options work well depending on your experience, pack weight, and ankle strength. Low-cut trail shoes offer agility and reduced leg fatigue, while mid-height boots provide enhanced ankle support and stone protection on steep staircases.
How much grip do I need for the Half Dome cables section?
You need shoes with high-friction sticky rubber outsoles that adhere reliably to polished granite rock. Outsoles like Vibram TC5+ or Omni-Grip provide the necessary surface traction to walk up the forty-five-degree pitch securely.
Should I choose waterproof shoes for the Mist Trail route?
Waterproof shoes keep your feet dry against heavy waterfall spray during early morning climbs past Vernal Fall. However, non-waterproof mesh shoes breathe better in hot afternoon temperatures and dry out quickly once you reach exposed sunny granite.
What is the top-rated option among Best Shoes for Hiking Half Dome in 2026?
The Merrell Moab 3 series remains a top-rated choice due to its balance of Vibram traction, shock-absorbing heel cushioning, and torsional arch stability. It provides the ideal blend of durability and comfort for long granite trails.
How should hiking shoes fit to prevent bruised toenails on the descent?
Your hiking shoes should have roughly a thumb’s width of empty space between your longest toe and the front bumper. This extra space prevents your toes from smashing repeatedly into the front of the shoe during the eight-mile downhill descent.
How far in advance should I break in my shoes before hiking Half Dome?
You should break in your hiking shoes at least three to four weeks before your trip by logging twenty to thirty miles on local trails. Breaking them in softens the upper leather, shapes the insole to your arch, and reveals potential hotspot locations.
Do I need rock climbing shoes for the Half Dome cable route?
No, rock climbing shoes are unnecessary and will cause extreme foot pain during the fifteen miles of standard trail walking. A quality pair of hiking shoes with sticky rubber outsoles provides plenty of grip for the cable section while remaining comfortable all day.
What socks should I pair with Best Shoes for Hiking Half Dome?
Pair your shoes with medium-cushion moisture-wicking merino wool or synthetic trail socks to reduce blister-causing friction. Wool regulates temperature effectively and maintains cushioning even when damp from trail sweat or waterfall mist.
How does midsole shank stiffness help on the Subdome stairs?
A molded nylon shank prevents your shoe from bending excessively around sharp, narrow rock edges on the steep Subdome staircase. This rigid platform reduces calf fatigue and protects the arch of your foot from continuous strain.
Can I hike Half Dome in running shoes or gym sneakers?
Standard gym sneakers are not recommended because their smooth foam outsoles lack traction on slick granite and offer minimal rock protection. You risk dangerous slips on the cables and severe foot bruising on rocky sections without proper hiking footwear.


Write Your Review
No reviews yet. Be the first to share your experience!